

 Following on from my earlier post How not to design a webpage, here's some tips for people making a webpage/blog/MySpace profile to follow to make things look a little better. I want to cover as much ground as possible, but I'll take things in small chunks, this time I'll concentrate on how to make the images on your site look as good as possible.
- If you're using an image on your site that was originally a different size to what you're going to be using it at, don't just code the different size into your HTML, use an image editing program to actually resize the image. This is a good idea for 2 reasons: It will look better, as image editing software will resample the image (a bit complicated to explain, but it basically means that your image will end up looking clearer than just giving the image different dimensions in HTML). Also, it will mean that people will not have to download a 1.5Mb image just to see the thumbnail size you've coded into your webpage, therefore the page will load faster.
- Anti-Alias your images. This is a basic function of most image editors, and makes the edges of text and graphics smoother. This is done at the pixel level, but you wouldn't believe how much of a difference it makes in terms of making your site feel more professional. Have a look at the image below:

- GIF images are best for images with large areas of solid colour - diagrams and cartoons are good examples of what to use GIF images for. You can only have a maximum of 256 colours in a gif image, but to make your file size smaller, you should set the number of colours in your image to be as low as possible. One of the benefits of using GIF images is that you can set one colour to be transparent, allowing anything behind the image to show thorough, this can be useful, although unless you know what colour is going to be behind your image, it can be difficult to make this look smooth. In this situation it would probably be better to use a PNG.
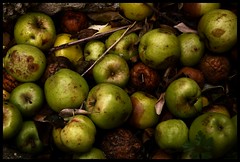
- JPEGs are better for photographs - anything where there's going to be smooth gradations from one colour to the next. You can set a level of compression for JPEG images - the more you turn the compression up, the smaller your file size will be, but the more 'blurred' your image will look. JPEG images have no transparency, so they will always be rectangular.
- PNGs are useful where you need an image to smoothly blend with it's background. This is the filetype you'd get if you cross-bred a GIF with a JPEG. It achieves this smoothness by allowing you to set each pixel to be any one of 256 levels of transparency, from totally transparent (you can totally see what's behind the image) to totally opaque (you can totally see the image). The downsides to this are that the filesizes tend to be bigger because of this, and not all browsers support this transparency effect. Internet Explorer 6 will show the image, but anything even slightly transparent will show as grey. Firefox 1+ and Opera will both show these images correctly, as will Internet Explorer 7. If you've still got IE6, I strongly suggest you upgrade to Firefox.


You have been enormously helpful. I am very pleased to announce that I have linked your site under my "Useful Links" classification, nut buried in my extensive blogroll.
ReplyDeleteYour site is great. I've passed it on to friends and put in favourites.
ReplyDeleteI like the new layout.
jeisea http://www.crps-rsd-a-better-life.blogspot.com
I have read your excellent post. This is a great job. I have enjoyed reading your post first time. I want to say thanks for this post. Thank you... Scarpe Running pronatori
ReplyDelete